

Tuesday, September 1, 2015
Confession, I tend to hide my favorite pieces of sea glass so that we don't make jewelry with them - bad, I know. I've been trying very hard to part with some colors lately because they are just too beautiful not to wear and enjoy every day. Here are 2 of our latest pieces. The photo doesn't do them justice as the colors are absolutely gorgeous in person. My goal is to have lots more done (from my stashed collection) before the holidays...and also to blog more! :)


Tuesday, May 26, 2015
Best Trip Ever to Spectacle Island!
Just wanted to share some happy news with other sea glass lovers because I thought you would enjoy the story.
I bought tickets weeks ago to take the first ferry of the season over to Spectacle Island. We wanted to see what treasures were left on the beach after the harsh winter. After walking the beach separately for a while (not a marble in sight!) Kevin called me over to show me a huge piece of cobalt he had found....and under the sea glass an engagement ring. ❤ Best surprise ever.....oh, we each found a marble shortly after!

I bought tickets weeks ago to take the first ferry of the season over to Spectacle Island. We wanted to see what treasures were left on the beach after the harsh winter. After walking the beach separately for a while (not a marble in sight!) Kevin called me over to show me a huge piece of cobalt he had found....and under the sea glass an engagement ring. ❤ Best surprise ever.....oh, we each found a marble shortly after!

Thursday, March 5, 2015
Authentic Sea Glass Meets Apetite
There's no doubt that sea glass on it's own is beautiful (especially the more rare colors!) but I wanted to do something different. I found these lovely apetite gemstones and combined it with a soft blue piece of California sea glass. The result is below! It's a longer length so it has a nice Bohemian feel to it which I love because it can be easily layered with other pieces.
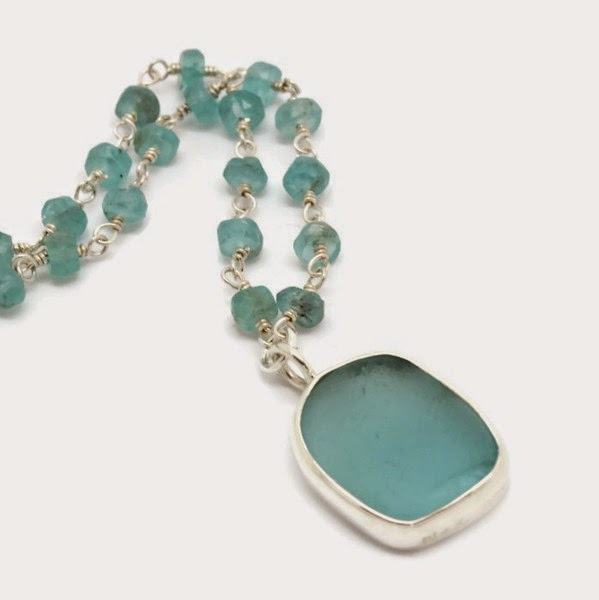 |
| Sea Glass and Apetite Necklace |
Monday, February 9, 2015
Ohajiki game pieces - now sea glass!
First time I've ever seen this type of sea glass. Game pieces from the Japanese game Ohajiki that were found on the coast of Japan. They are so cool. Nicely textured and pretty colors. The sea glass pieces are going to make fantastic pendants!


Wednesday, January 28, 2015
Footprints!
It seemed like winter in New England was going to be an easy one until yesterday when we got a bunch of snow! We thought this quote was so appropriate. 😊


Wednesday, January 7, 2015
Coastal Contest!
 |
Tuesday, October 21, 2014

Tuesday, October 7, 2014
Sherwood Island, CT

Tuesday, September 16, 2014

Monday, September 8, 2014


Thursday, July 24, 2014
Newport, Rhode Island!
Newport is one of my most favorite places to be. This day wasn't so much about sea glass but about hanging out with the family and flying kites!
Saturday, July 12, 2014
Favorite Earrings!
When I'm not wearing sea glass, I like classics...pieces that are well made and can be worn with anything.
We've been working on a "Simply Sterling" line and these hoops are the first in this upcoming collection.
 |
| Available at www.WiltonArtisans.com |
Tuesday, May 27, 2014
Easy, DIY Nautical Coasters
Nautical Coasters DIY
With BBQs, Graduation parties and all the other fun things that come with the start of summer, I love to have a few handmade gifts on hand for the host/hostess. Our intern came up with an easy, inexpensive project after a recent trip to our local Michael's store.
These DIY coasters are quick, colorful and the perfect gift!
Materials:
Pottery coasters - Painter's Tape - Martha Stewart Crafts, Nautical stencils (there were lots of stencils to choose from!) - Paper Plates - Paint brushes - Scissors - Cup with water (for washing brushes) - Multi-surface, acrylic craft paint by Martha Stewart Crafts
Colors we used: Putty, Copper, Habanero, Summer Haze, Deep Sea
.JPG) Instructions:
Instructions:
1. Cut out whichever stencils you want to use. We loved the whole nautical theme, especially since Memorial Day was right around the corner.
.JPG)
2. Tape one stencil to a coaster so that it doesn't move while you're painting it.

3. Use the paper plates as palettes. Then, using the paint brushes, carefully paint the coasters over the stencils. Less paint is definitely the way to go when making the stencil. I used too much paint while working on the anchor coaster and it ended up "bleeding" under the stencil. It was an easy problem to fix....I just painted the entire coaster blue, waited for the paint to dry, and then re-stenciled. Inside the Martha Stewart Crafts stencils, there are instructions that explain the best technique to use.
.JPG)
4. Wait for the paint to dry bit and then gently remove the stencil.
.JPG)
5. Ta-Da! You now have stylish, nautical coasters!
.JPG)
.JPG)
With BBQs, Graduation parties and all the other fun things that come with the start of summer, I love to have a few handmade gifts on hand for the host/hostess. Our intern came up with an easy, inexpensive project after a recent trip to our local Michael's store.
These DIY coasters are quick, colorful and the perfect gift!
Materials:
Pottery coasters - Painter's Tape - Martha Stewart Crafts, Nautical stencils (there were lots of stencils to choose from!) - Paper Plates - Paint brushes - Scissors - Cup with water (for washing brushes) - Multi-surface, acrylic craft paint by Martha Stewart Crafts
Colors we used: Putty, Copper, Habanero, Summer Haze, Deep Sea
1. Cut out whichever stencils you want to use. We loved the whole nautical theme, especially since Memorial Day was right around the corner.
2. Tape one stencil to a coaster so that it doesn't move while you're painting it.
3. Use the paper plates as palettes. Then, using the paint brushes, carefully paint the coasters over the stencils. Less paint is definitely the way to go when making the stencil. I used too much paint while working on the anchor coaster and it ended up "bleeding" under the stencil. It was an easy problem to fix....I just painted the entire coaster blue, waited for the paint to dry, and then re-stenciled. Inside the Martha Stewart Crafts stencils, there are instructions that explain the best technique to use.
4. Wait for the paint to dry bit and then gently remove the stencil.
5. Ta-Da! You now have stylish, nautical coasters!
The blank coasters came tied with raffia ribbon so we just retied around 4 of the coasters to make the perfect hostess gift!
Subscribe to:
Posts (Atom)